Net企业级AI项目6:接入外部世界
2026-02-14 21:46:24一、MCP概述
1. MCP协议
我们示例到目前所有的功能都是在项目内部开发完成的,如果一个 AI 应用只能使用内部功能,那它还达不到企业级 AI 的要求。因为企业内部会有各种各样的应用软件,虽然前面我们介绍了通过使用 AI 访问数据库来读取业务数据,但那只能满足简单的读取数据库的需求。
真实业务场景会复杂得多,比如希望在数据库中查找最新的销售报告,并将其通过电子邮件发送给指定的角色用户。这里发送邮件是企业内部邮箱服务的功能,而指定角色是身份服务的功能。这些功能在企业内部对应的应用中已经实现了,我们不可能在 AI 系统中再实现一次,而是需要让 AI 拥有调用其他系统的能力。
类似于 Web 系统中的 API 接口一样,AI 也有专门外部系统接入的协议,它就是 MCP 协议。
关于 MCP 的内容,我已经在前面的文章中详细介绍过了,请跳转到 MCP大模型外挂商店 阅读。
2. MCP 交互流程
我们用前面说的“在数据库中查找最新的销售报告,并将其通过电子邮件发送给指定的角色用户”来举例:
- 初始化:MCP 客户端连接到 MCP 服务器
- LLM推理:查询数据库 + 查询角色 + 发送邮件
- 工具调用:MCP 客户端负责接受指令,发送给MCP服务器
- 执行:MCP 服务器负责执行,返给结果给客户端,返回给LLM
- 生成最终答复
3. MCP 服务生态
官方代码库 :由 MCP 维护的 GitHub 代码库是首选的起点 。这里包含了许多常用服务的参考实现,例如本地文件系统、GitHub、Git、PostgreSQL 和用于浏览器自动化的 Puppeteer。这些官方服务器是学习和理解 MCP 最佳实践的绝佳范例。
社区精选列表 :这是一个由社区驱动和维护的 GitHub 列表,它展示了 MCP 生态系统的广度和创造力 。在这里,可以找到从浏览器自动化、数据库交互到智能家居控制和特定应用(如 Bilibili 内容搜索)的各种服务器 。
MCP市场:一个第三方的 MCP 服务器和客户端市场,聚合了大量的服务器和客户端,并提供了分类和搜索功能 。
4. 安装 MCP 文件系统服务
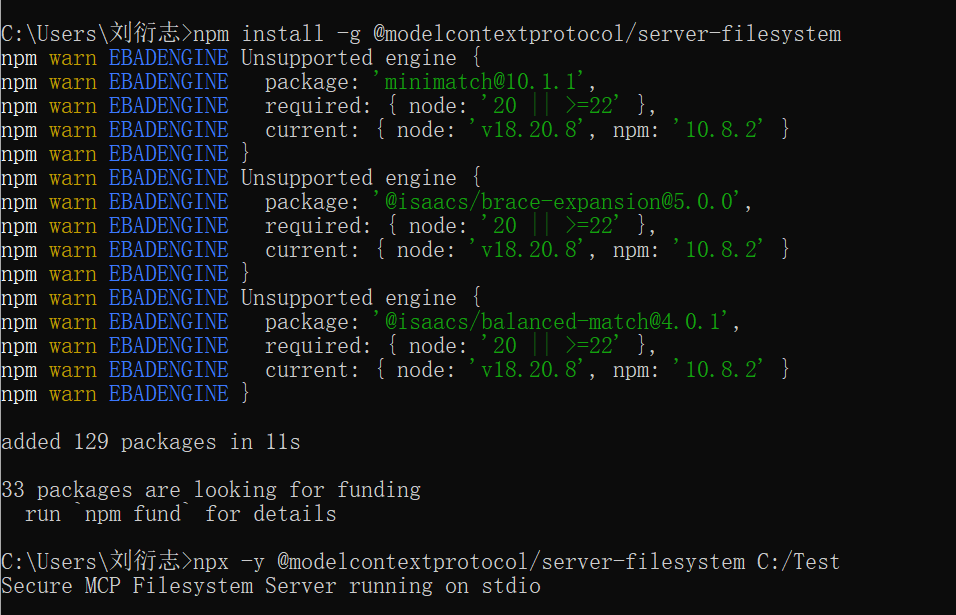
这里我们从 github 中下载 modelcontextprotocol 提供的 filesystem 来做示例。
安装这个文件系统服务提供了很多种方式,细节可以查看项目说明。我们这里采用 npx 来安装
npm install -g @modelcontextprotocol/server-filesystem
接下来我们构建一个 MCP 主机,来使用这个文件系统服务。项目文档里面也有介绍
npx -y @modelcontextprotocol/server-filesystem C:/Test
C:/Test 是最小配置原则,必需至少配置一个可以访问的目录,文件系统服务操作设置的目录。多个目录用空格区分
图中我们看到已经启动了一个MCP服务,这个服务使用的是stdio通信方式,这意味着我们没有任何方法来使用这个MCP服务,因为没有提供外部的通信方式。
stdio包括: 标准输入 stdin,标准输出 stdout,标准错误 stderr。它的通信方式是嵌入到其他进程,已子进程的方式来执行。
我们可以用这个命令来看一下服务是否正常(检查正常后可以关闭)。
二、MCP 插件架构设计
我们已经有了一个 MCP 服务了,那怎么把这个服务接入到我们 AI 应用中去呢?
我们知道 AI 应用有三大能力:资源、提示词、工具。很显然,MCP 它应该属于工具范畴。
我们之前已经提供了一套插件式的工具框架,那些工具都是应用内部实现好的,我们称做静态工具。
现在我们需要在这个基础上扩展一个 MCP 的插件架构,我们把这种工具称做动态工具。
接下来我们看看如何实现这个架构。
1. 配置的动态性
首先我们需要创建一个专门的 MCP 服务的管理应用,我们使用数据库来管理 AI 能使用 MCP 服务。
- 我们在 Core 层创建名为 Qjy.AICopilot.Core.McpServer 的类库项目
//Qjy.AICopilot.Core.McpServer/Aggregates/McpServerInfo/McpServerInfo.cs
public class McpServerInfo : IAggregateRoot
{
    protected McpServerInfo()
    {
    }

    public McpServerInfo(
        string name,
        string description,
        McpTransportType transportType,
        string? command,
        string arguments)
    {
        Id = Guid.NewGuid();
        Name = name;
        Description = description;
        TransportType = transportType;
        Command = command;
        Arguments = arguments;
        IsEnabled = true;
    }

    public Guid Id { get; set; }

    // 服务名称,作为插件的唯一标识,例如 "github-server"
    public string Name { get; private set; } = null!;

    // 服务描述
    public string Description { get; private set; } = null!;

    // 传输类型:Stdio 或 Sse
    public McpTransportType TransportType { get; private set; }

    // 针对 Stdio 的配置:可执行文件路径 (如 "node", "python")
    public string? Command { get; private set; }

    // 针对 Stdio 的配置:启动参数 (如 "build/index.js")
    // 针对 SSE 的配置:目标 URL
    public string Arguments { get; private set; } = null!;

    // 是否启用
    public bool IsEnabled { get; private set; }
}

public enum McpTransportType
{
    Stdio = 1,
    Sse = 2
}
- 配置数据库映射
public class McpServerConfiguration : IEntityTypeConfiguration<McpServerInfo>
{
    public void Configure(EntityTypeBuilder<McpServerInfo> builder)
    {
        builder.ToTable("mcp_server_info");

        builder.HasKey(b => b.Id);
        builder.Property(b => b.Id).HasColumnName("id");

        builder.Property(b => b.Name)
            .IsRequired()
            .HasMaxLength(100)
            .HasColumnName("name");

        // 保证名称唯一
        builder.HasIndex(b => b.Name).IsUnique();

        builder.Property(b => b.Description)
            .IsRequired()
            .HasMaxLength(500)
            .HasColumnName("description");

        builder.Property(b => b.Command)
            .HasMaxLength(200)
            .HasColumnName("command");

        builder.Property(b => b.Arguments)
            .IsRequired()
            .HasMaxLength(1000)
            .HasColumnName("arguments");

        builder.Property(b => b.TransportType)
            .IsRequired()
            .HasConversion<string>() // 存储枚举字符串,增强可读性
            .HasMaxLength(50)
            .HasColumnName("transport_type");

        builder.Property(b => b.IsEnabled)
            .IsRequired()
            .HasColumnName("is_enabled");
    }
}
- 添加种子数据
//Qjy.AICopilot.MigrationWorkApp/SeedData/McpServerInfoData.cs
public static class McpServerInfoData
{
    public static IEnumerable<McpServerInfo> GetMcpServerInfos()
    {
        // 添加文件系统
        var fileSystemAgentPlugin = new McpServerInfo(
            "FileSystem",
            "提供本地文件系统访问能力,它允许在限定的目录范围内执行文件和目录相关操作,包括读取文件内容、创建和写入文件、列出目录结构、移动或重命名文件等。",
            McpTransportType.Stdio,
            "npx",
            @"-y @modelcontextprotocol/server-filesystem C:\Test"
        );

        return [fileSystemAgentPlugin];
    }
}

//Qjy.AICopilot.MigrationWorkApp/Worker.cs
private static async Task SeedDataAsync(
    AiCopilotDbContext dbContext,
    RoleManager<IdentityRole> roleManager,
    UserManager<IdentityUser> userManager,
    CancellationToken cancellationToken)
{
    // 其他代码

    // 创建默认MCPServer
    if (!await dbContext.McpServerInfos.AnyAsync(cancellationToken: cancellationToken))
    {
        await dbContext.McpServerInfos.AddRangeAsync(McpServerInfoData.GetMcpServerInfos(), cancellationToken);
    }
}
2. 插件的统一性
MCP 工具本质上它也是一种工具,能通过配置 ChatClient 的 AITools 属性来实现工具调用,因此我们需要统一管理系统工具和 MCP 工具。
要将两种类型不相同的对象,让它们能一起使用,设计模式中有很多中实现方式。比如适配器模式、桥接模式等。
我们这里使用桥接模式来实现,我们可以直接在原来的插件框架上,将 MCP 工具转化成 AITools 即可。
- 在插件框架中定义一个桥接插件,实现 IAgentPlugin 接口,用于将外部 MCP 服务适配为内部的原生插件
//Qjy.AICopilot.AgentPlugin/GenericBridgePlugin.cs
/// <summary>
/// MCP 通用桥接插件。
/// 该类实现了 IAgentPlugin 接口,用于将外部 MCP 服务适配为内部的原生插件。
/// 它不包含具体的业务逻辑,而是作为 MCP 工具集的容器。
/// </summary>
public class GenericBridgePlugin : IAgentPlugin
{
    /// <summary>
    /// 插件名称。
    /// 映射自 McpServerInfo.Name。
    /// 使用 required 关键字强制在初始化时赋值,确保插件标识的完整性。
    /// </summary>
    public required string Name { get; init; }

    /// <summary>
    /// 插件描述。
    /// 映射自 McpServerInfo.Description。
    /// 这段描述将被注入到 LLM 的 System Prompt 中,用于指导模型何时使用该插件。
    /// </summary>
    public required string Description { get; init; }

    /// <summary>
    /// 动态注入的工具列表。
    /// 这些工具对象由 MCP SDK 在握手阶段解析生成,包含了工具名称、参数 Schema 以及执行回调。
    /// </summary>
    public IEnumerable<AITool>? AITools { get; init; }

    /// <summary>
    /// 实现接口方法,向 Agent 暴露该插件所拥有的所有能力。
    /// </summary>
    /// <returns>工具定义集合</returns>
    public IEnumerable<AITool>? GetAITools()
    {
        return AITools;
    }
}
- 扩展 AgentPluginLoader 类,提供一个既支持注册原生插件,也支持注册 MCP 桥接插件的方法
//Qjy.AICopilot.AgentPlugin/AgentPluginLoader.cs
/// <summary>
/// 动态注册一个 Agent 插件。
/// 该方法既支持注册原生插件,也支持注册 MCP 桥接插件。
/// </summary>
/// <param name="plugin">插件实例</param>
public void RegisterAgentPlugin(IAgentPlugin plugin)
{
    // 1. 存储插件实例
    _plugins[plugin.Name] = plugin;

    // 2. 提取并缓存工具列表
    // 这一步是为了优化性能,避免每次 Agent 询问工具时都去遍历插件
    var tools = plugin.GetAITools()?.ToArray() ?? [];
    _aiTools[plugin.Name] = tools;
}
3. 生命周期管理
每一个 MCP 服务都有启动和停止过程,我们不可能为要求每个接入的 MCP 服务去单独实现服务的启动和停止,因此我们需要提供统一的生命周期管理实现。
首先我们创建一个 Qjy.AICopilot.McpService 类库项目,添加 ModelContextProtocol 包的引用
我们封装一个 IMcpServerBootstrap 接口,并提供默认 MCP 启动实现,支持 Stdio 和 Sse 两种交互方式。在启动过程中,同时将 MCP 工具使用前面提供的 RegisterAgentPlugin 方法,将 MCP 工具加载到工具列表中。
//Qjy.AICopilot.McpService/IMcpServerBootstrap.cs
public interface IMcpServerBootstrap
{
    IAsyncEnumerable<McpClient> StartAsync(CancellationToken cancellationToken);
}

//Qjy.AICopilot.McpService/McpServerBootstrap.cs
public class McpServerBootstrap(
    IDataQueryService dataQueryService,
    AgentPluginLoader agentPluginLoader,
    ILogger<McpServerBootstrap> logger) : IMcpServerBootstrap
{
    public async IAsyncEnumerable<McpClient> StartAsync([EnumeratorCancellation] CancellationToken ct)
    {
        var query = dataQueryService.McpServerInfos
            .Where(m => m.IsEnabled);

        var mcpServerInfos = await dataQueryService.ToListAsync(query);

        foreach (var mcpServerInfo in mcpServerInfos)
        {
            McpClient mcpClient = null!;
            switch (mcpServerInfo.TransportType)
            {
                case McpTransportType.Stdio:
                    mcpClient = await CreateStdioClientAsync(mcpServerInfo, ct);
                    break;
                case McpTransportType.Sse:
                    mcpClient = await CreateSseClientAsync(mcpServerInfo, ct);
                    break;
            }

            logger.LogInformation(
                "已连接到 MCP 服务器 - {Name}",
                mcpServerInfo.Name);

            var tools = await mcpClient.ListToolsAsync(
                cancellationToken: ct);

            logger.LogInformation(
                "已发现 {ToolsCount} 个工具",
                tools.Count);

            // 构建并注册适配器插件
            // 这一步将 MCP 的数据模型转换为 Agent 的插件模型
            RegisterMcpPlugin(mcpServerInfo, tools);

            logger.LogInformation(
                "已注册 MCP 插件 - {Name}",
                mcpServerInfo.Name);

            yield return mcpClient;
        }
    }

    private async Task<McpClient> CreateStdioClientAsync(McpServerInfo mcpServerInfo, CancellationToken ct)
    {
        var transportOptions = new StdioClientTransportOptions
        {
            Command = "npx",
            Arguments = mcpServerInfo.Arguments.Split(' ')
        };

        var transport = new StdioClientTransport(transportOptions);
        return await McpClient.CreateAsync(
            transport,
            cancellationToken: ct);
    }

    private async Task<McpClient> CreateSseClientAsync(McpServerInfo mcpServerInfo, CancellationToken ct)
    {
        var transportOptions = new HttpClientTransportOptions
        {
            Endpoint = new Uri(mcpServerInfo.Arguments)
        };

        var transport = new HttpClientTransport(transportOptions);
        return await McpClient.CreateAsync(
            transport,
            cancellationToken: ct);
    }

    /// <summary>
    /// 将 MCP 服务元数据和工具列表封装为通用桥接插件,并注册到系统。
    /// </summary>
    /// <param name="info">数据库中的服务配置信息</param>
    /// <param name="mcpTools">从 MCP Client 获取的实时工具列表</param>
    private void RegisterMcpPlugin(McpServerInfo info, IEnumerable<AITool> mcpTools)
    {
        var mcpPlugin = new GenericBridgePlugin
        {
            // 名称作为命名空间,至关重要
            Name = info.Name,

            // 描述用于语义路由
            Description = info.Description,

            // 直接传递工具集合
            AITools = mcpTools
        };

        // 注册到全局插件系统
        agentPluginLoader.RegisterAgentPlugin(mcpPlugin);
    }
}
- 实现 MCP 管理逻辑,即实现 MCP 的启动和停止逻辑
//Qjy.AICopilot.McpService/McpServerManager.cs
public class McpServerManager(IServiceScopeFactory scopeFactory, ILogger<McpServerManager> logger) : IHostedService
{
    // 用于存储所有活跃的客户端实例
    private readonly IList<McpClient> _mcpClients = [];

    /// <summary>
    /// 应用启动时触发
    /// </summary>
    public async Task StartAsync(CancellationToken ct)
    {
        logger.LogInformation("=== MCP Server Manager 启动中 ===");

        // 1. 显式创建作用域,以解析 Scoped 服务
        using var scope = scopeFactory.CreateScope();

        // 2. 从作用域中获取启动器
        var bootstrap = scope.ServiceProvider.GetRequiredService<IMcpServerBootstrap>();

        // 3. 消费异步流
        // 这里的 await foreach 使得只要有一个服务连接成功,就可以立即处理,
        // 而不必等待所有服务都连接完成。
        await foreach (var mcpClient in bootstrap.StartAsync(ct))
        {
            // 将客户端实例加入内存列表进行托管
            _mcpClients.Add(mcpClient);
        }

        logger.LogInformation("=== MCP Server Manager 启动完成,共托管 {Count} 个服务 ===", _mcpClients.Count);
    }

    /// <summary>
    /// 应用停止时触发
    /// </summary>
    public async Task StopAsync(CancellationToken ct)
    {
        logger.LogInformation("正在关闭 MCP 服务连接...");

        // 优雅关闭:并行释放所有客户端资源
        // 我们不希望一个客户端的关闭卡死阻碍其他客户端的关闭
        var closeTasks = _mcpClients.Select(async client =>
        {
            try
            {
                // DisposeAsync 会发送关闭信号,对于 Stdio 传输,这会 Kill 掉子进程
                await client.DisposeAsync();
            }
            catch (Exception ex)
            {
                logger.LogError(ex, "关闭 MCP 客户端时发生错误");
            }
        });

        await Task.WhenAll(closeTasks);

        _mcpClients.Clear();
        logger.LogInformation("所有 MCP 服务资源已释放");
    }
}
- 服务注册
//Qjy.AICopilot.McpService/DependencyInjection.cs
public static class DependencyInjection
{
    public static void AddMcpService(this IHostApplicationBuilder builder)
    {
        // 注册启动器为 Scoped,因为它依赖于 Scoped 的 DbContext
        builder.Services.AddScoped<IMcpServerBootstrap, McpServerBootstrap>();

        // 注册管理器为 HostedService
        // 这是一个 Singleton 单例,会在应用生命周期内一直存在
        builder.Services.AddHostedService<McpServerManager>();
    }
}

//Qjy.AICopilot.HttpApi/DependencyInjection.cs
public void AddApplicationService()
{
    // 其他代码

    builder.AddMcpService();
}
三、人机协助
1. 人机协作理论基础
目前我们已经实现了系统工具和 MCP 工具,但现在还存在一个问题。传统软件在执行工具调用时,具有确定性。而 AI Agent 存在概率性,可能发生错误的工具选择,或者生成错误的参数。因此对于一些具有风险的操作,需要进行人工审批。
信任边界模型,对操作分类:
- 只读安全区,无需干预
- 可逆操作区,事后审计、弱审批
- 关键不可逆操作区,强制审批
Agent 自主性分级体系:
- L0:手动工具
- L1:辅助驾驶
- L2:监督式代理
- L3:条件自治
- L4:完全自治
状态流程:
- 思考中:生成并生成工具调用
- 挂起/等待批准:保存当前上下文、堆栈信息、待执行的参数。持久化到缓存/数据库,释放计算资源,生成一个审批 ID 返回给用户
- 恢复/唤醒:用户提交带有审批 ID 和结构(Y/N)的请求,系统根据 ID 加载之前的上下文,将用户的审批和结果注入到 Agent 的消息历史
- 执行中:Agent获得授权,实际调用工具
2. Agent 框架审批机制
审批请求包括内容:
- 意图摘要
- 工具详情
- 风险提示
用户响应内容:
- 批准或拒绝
- 携带审批 ID
Agent 框架审批机制:
- 审批目标:函数调用请求
- 标准工具调用:
- 推理
- 生成
- 拦截
- 生成审批请求,函数审批请求对象,Agent 等待下一轮对话
- 用户批准,构造函数审批响应对象(标记为批准/拒绝),决定是否执行工具,拒绝时给LLM抛出特定错误
- 解析/执行
- 回调
Agent 框架使用装饰器模式,提供了专门需要人工审批机制 Function
public class ApprovalRequiredAIFunction : AIFunction
{
    private readonly AIFunction _innerFunction;
    public ApprovalRequiredAIFunction(AIFunction inner)
    {
		_innerFunction = inner;
        //继承元数据,但添加“需要审批”的标记
    }

    //在调用逻辑中,框架会识别这个标记
/
3. 统一工具权限拦截
并不是所有工具的调用都需要审批,所以我们需要提前知道哪些工具是高风险的。
我们这里使用黑白名单的方式来实现,就跟 Agent 框架使用的装饰器模式一样,给具有高风险的工具加上一个标记,Agent 框架会自动识别这个标记。
对于系统工具,由于这部分工具是在项目内开发实现了。要给这些工具添加标记,只需要添加一个专门的数据即可。
对于 MCP 工具,由于没办法去修改 MCP 服务的实现,我们只好采用动态配置的方式给工具配置风险等级。我们项目中 MCP 服务是配置在数据库中的,因此我们可以在配置 MCP 服务前,根据 MCP 服务的文档,提前识别好风险工具,然后把风险工具配置在数据库中,来实现动态配置。
现在我们来分别实现这两类工具的标识:
- 扩展插件接口和抽象基类
- 在接口中,添加 HighRiskTools 属性。
- 在抽象基类的 GetAITools 方法中,将 HighRiskTools 中配置的工具包装成 ApprovalRequiredAIFunction,框架自动实现人工审批。
//Qjy.AICopilot.AgentPlugin/IAgentPlugin.cs
public interface IAgentPlugin
{
    /// <summary>
    /// 获取该插件中被标记为“高风险”或“敏感”的工具名称列表。
    /// 位于此列表中的工具,在被 Agent 调用时,会触发人机回环拦截机制,
    /// 要求用户显式批准后方可执行。
    /// </summary>
    IEnumerable<string>? HighRiskTools { get; }
}

//Qjy.AICopilot.AgentPlugin/AgentPluginBase.cs
public abstract class AgentPluginBase : IAgentPlugin
{
    /// <summary>
    /// 利用 Microsoft.Extensions.AI 库,将 C# 方法自动转换为 AITool。
    /// 并根据 HighRiskTools 配置,自动为敏感工具添加审批拦截器。
    /// </summary>
    public IEnumerable<AITool>? GetAITools()
    {
        // 1. 获取所有标记了 [Description] 的方法
        // 这些是原始的业务逻辑方法
        var rawMethods = GetToolMethods();

        // 2. 转换为 AITool 并注入拦截逻辑
        var tools = rawMethods.Select(method =>
        {
            // 步骤 A: 创建基础 AI 函数
            // AIFunctionFactory.Create 是微软提供的工厂方法,
            // 它会读取方法签名、参数类型和 Description 特性,生成 JSON Schema。
            // 'this' 参数确保了当工具被调用时,是在当前插件实例上执行的。
            var function = AIFunctionFactory.Create(method, this);

            // 步骤 B: 检查该方法是否在高风险列表中
            if (HighRiskTools == null || !HighRiskTools.Contains(method.Name))
            {
                // 如果是普通工具,直接返回
                return function;
            }

            // 步骤 C: 注入审批拦截器
            // 如果是高风险工具,我们不直接返回原始 function,
            // 而是将其包装在 ApprovalRequiredAIFunction 中。
            // 当 LLM 尝试调用此工具时,框架会识别这个包装器,并挂起执行,等待人工审批。
            #pragma warning disable MEAI001
            var approvalFunction = new ApprovalRequiredAIFunction(function);

            return approvalFunction;
        });

        return tools;
    }

    public virtual IEnumerable<string>? HighRiskTools { get; init; }
}

//给 MCP 通用桥接插件也实现 IAgentPlugin 接口
//Qjy.AICopilot.AgentPlugin/GenericBridgePlugin.cs
public class GenericBridgePlugin : IAgentPlugin
{
    public IEnumerable<string>? HighRiskTools { get; init; }
}
- 系统工具的拦截:这里我们删除之前实现的系统时间工具,重新创建一个系统工具。提供“获取系统时间”和“重启服务器(假实现)”,2个系统工具。
//Qjy.AICopilot.AiGatewayService/Plugins/SystemOpsPlugin.cs
public class SystemOpsPlugin : AgentPluginBase
{
    public override string Description => "提供系统级别的运维操作能力,如时间查询、服务重启等。";

    // 在此处静态定义:RestartServer 是高风险工具
    // 使用 nameof 关键字可以避免硬编码字符串带来的拼写错误风险,并支持重构
    public override IEnumerable<string> HighRiskTools => [nameof(RestartServer)];

    [Description("获取当前系统时间")]
    public string GetSystemTime() => DateTime.Now.ToString("O");

    [Description("执行服务器重启操作")]
    public string RestartServer()
    {
        // 实际场景中,这里可能会调用 Process.Start("shutdown", "/r /t 0");
        return "Server restart command issued successfully.";
    }
}
- MCP 工具的拦截,修改 MCP 实体模型,并通过种子数据配置风险工具,最后修改 MCP 启动方法,使用 ApprovalRequiredAIFunction 包装风险工具。
//步骤1:修改模型
//Qjy.AICopilot.Core.McpServer/Aggregates/McpServerInfo/McpServerInfo.cs
public class McpServerInfo : IAggregateRoot
{
    public McpServerInfo(
        string name,
        string description,
        McpTransportType transportType,
        string? command,
        string arguments,
        List<string>? sensitiveTools = null)
    {
        // 其他代码
        SensitiveTools = sensitiveTools;
    }

    // 敏感工具列表
    public List<string>? SensitiveTools { get; private set; }
}

//步骤2:配置数据库映射
//Qjy.AICopilot.EntityFrameworkCore/Configuration/McpServer/McpServerConfiguration.cs
public void Configure(EntityTypeBuilder<McpServerInfo> builder)
{
	// 其它代码

    builder.Property(b => b.SensitiveTools)
        .HasColumnName("sensitive_tools");
}

//步骤3:在种子数据中配置风险工具
//Qjy.AICopilot.MigrationWorkApp/SeedData/McpServerInfoData.cs
public static class McpServerInfoData
{
    public static IEnumerable<McpServerInfo> GetMcpServerInfos()
    {
        // 1. 定义文件系统的高风险操作列表
        // 这些字符串必须与 MCP Server 提供的工具名称严格匹配
        var fileSystemRisks = new List<string>
        {
            "write_file",
            "edit_file",
            "move_file"
        };

        // 添加文件系统
        var fileSystemAgentPlugin = new McpServerInfo(
            "FileSystem",
            "提供本地文件系统访问能力,它允许在限定的目录范围内执行文件和目录相关操作,包括读取文件内容、创建和写入文件、列出目录结构、移动或重命名文件等。",
            McpTransportType.Stdio,
            "npx",
            @"-y @modelcontextprotocol/server-filesystem E:\Test",
            fileSystemRisks
        );

        return [fileSystemAgentPlugin];
    }
}

//步骤4:修改
//Qjy.AICopilot.McpService/McpServerBootstrap.cs
/// <summary>
/// 将 MCP 服务元数据和工具列表封装为通用桥接插件,并注册到系统。
/// 在此过程中,根据配置动态注入审批拦截器。
/// </summary>
/// <param name="mcpServerInfo">包含敏感工具配置的数据库实体</param>
/// <param name="mcpTools">从 MCP Client 实时获取的原始工具列表</param>
private void RegisterMcpPlugin(McpServerInfo mcpServerInfo, IList<McpClientTool> mcpTools)
{
    // 1. 动态转换与封装工具
    var tools = mcpTools
        .Select<McpClientTool, AIFunction>(tool =>
        {
            // 步骤 A: 检查当前工具是否在数据库配置的敏感列表中
            var isSensitive = mcpServerInfo.SensitiveTools != null &&
                              mcpServerInfo.SensitiveTools.Contains(tool.Name);

            if (!isSensitive)
            {
                // 如果不是敏感工具,直接返回原始的 McpClientTool
                // McpClientTool 本身实现了 AIFunction,可以直接使用
                return tool;
            }

            // 步骤 B: 注入审批拦截器
            // 对于 MCP 工具,原理与原生插件完全一致。
            // 我们使用 ApprovalRequiredAIFunction 将原始的 MCP 工具包裹起来。
            // 当 Agent 调用此工具时,会先触发宿主的审批流程,
            // 审批通过后,ApprovalRequiredAIFunction 内部会调用 tool.InvokeAsync,
            // 进而通过 JSON-RPC 发送给远程的 Node.js 进程。
            #pragma warning disable MEAI001
            var approvalFunction = new ApprovalRequiredAIFunction(tool);
            return approvalFunction;
        });

    // 2. 创建通用桥接插件
    // 将处理过的工具列表(包含普通工具和包装后的审批工具)赋值给插件
    var mcpPlugin = new GenericBridgePlugin
    {
        Name = mcpServerInfo.Name,
        Description = mcpServerInfo.Description,
        // 这里传入的是已经混合了 Wrapper 的 AIFunction 集合
        AITools = tools,

        // 同时,我们将原始的敏感列表赋值给 HighRiskTools 属性
        // 这样做是为了让 UI 层或元数据层能够知道哪些工具是高风险的
        // (即使执行层的拦截已经由 AITools 内部的对象处理了)
        HighRiskTools = mcpServerInfo.SensitiveTools
    };

    // 3. 注册到全局插件加载器
    agentPluginLoader.RegisterAgentPlugin(mcpPlugin);
}
4. 重构审批工作流
扩展人机协助之后,由于人工审批可能是几分钟之后,也可能是第二天,程序不可能一直等待。此时,AI 应用需要流程挂起,等待用户决策。用户回复后,又需要进行系统恢复,继续下一步工作流。
这时候,我们的工作流模式将变成两种情况:
- 对话流程:通过意图识别、RAG搜索、数据分析、工具挂载等,进行 Agent 构建,然后 Agent 运行。
- 审批流程:直接 Agent 运行(复用之前的 Agent 上下文)
接下来,我们重构一下目前的工作流实现。
- 步骤1:创建 Agent 上下文对象
//Qjy.AICopilot.AiGatewayService/Workflows/FinalAgentContext.cs
public class FinalAgentContext
{
    // 核心 Agent 实例
    public required AIAgent Agent { get; init; }

    // 当前对话的线程/历史记录
    public required AgentThread Thread { get; init; }

    // 用户输入的文本(或是经过 RAG 增强后的 Prompt)
    public required string InputText { get; set; }

    // 运行选项,包含了动态挂载的工具列表、温度设置等
    public required ChatClientAgentRunOptions RunOptions { get; init; }

    // 会话 ID
    public Guid SessionId { get; init; }

    // --- 审批相关状态 ---

    // 待处理的审批请求内容集合
    // 当 Agent 发起审批时,我们将请求对象暂存在这里
    #pragma warning disable MEAI001
    public List<FunctionApprovalRequestContent> FunctionApprovalRequestContents { get; } = [];

    // 用户本次批准的 CallId 列表
    // 当用户提交批准时,前端会传回这些 ID
    public List<string> FunctionApprovalCallIds { get; } = [];
}
- 步骤 2:删除旧的最终处理执行器(FinalProcessExecutor),拆分为 Agent 构建执行器和 Agent 运行执行器
- Agent 构建执行器:负责冷启动,输出一个初始化完毕的 Agent 上下文对象。用户发起新一轮对话执行
- Agent运行执行器:负责热运行,接受一个准备好的 Agent 上下文,进入流式循环,实现可重入
//删除 FinalProcessExecutor.cs
//Qjy.AICopilot.AiGatewayService/Workflows/FinalProcessExecutor.cs
- 步骤 3:实现最终 Agent 构建执行器,就是将旧的 FinalProcessExecutor 中执行部分的代码抽出去,然后构建 FinalAgentContext 并传递给下一个节点。
//Qjy.AICopilot.AiGatewayService/Workflows/FinalAgentBuildExecutor.cs
/// <summary>
/// 最终 Agent 构建执行器
/// 职责:利用聚合后的上下文构建 Agent,注入 RAG 提示词。
/// </summary>
public class FinalAgentBuildExecutor(
    ChatAgentFactory agentFactory,
    IDataQueryService dataQuery,
    ILogger<FinalAgentBuildExecutor> logger) :
    Executor<GenerationContext>("FinalAgentBuildExecutor")
{
    public override async ValueTask HandleAsync(
        GenerationContext genContext,
        IWorkflowContext context,
        CancellationToken ct = default)
    {
        try
        {
            var request = genContext.Request;
            logger.LogInformation("开始最终生成,SessionId: {SessionId}", request.SessionId);

            // 1. 获取会话关联的模板配置
            // 我们需要知道当前会话使用的是哪个 Agent 模板(例如"通用助手"或"HR助手")
            var session = await dataQuery.FirstOrDefaultAsync(dataQuery.Sessions.Where(s => s.Id == request.SessionId));

            if (session == null) throw new InvalidOperationException("会话不存在");

            // 2. 创建基础 Agent 实例
            // 此时 Agent 拥有的是数据库中定义的静态 System Prompt
            var agent = await agentFactory.CreateAgentAsync(session.TemplateId, isSaveChatMessage: false);

            // 3. 构建 Prompt (RAG 与 数据分析上下文注入)
            string finalUserPrompt;
            var hasKnowledge = !string.IsNullOrWhiteSpace(genContext.KnowledgeContext);
            var hasDataAnalysis = !string.IsNullOrWhiteSpace(genContext.DataAnalysisContext);
            var hasContext = hasKnowledge || hasDataAnalysis;

            if (hasContext)
            {
                // 构建混合上下文内容
                var contextBuilder = new StringBuilder();

                if (hasDataAnalysis)
                {

                    contextBuilder.AppendLine("数据库查询结果:");
                    contextBuilder.AppendLine(genContext.DataAnalysisContext);
                    contextBuilder.AppendLine();
                }

                if (hasKnowledge)
                {
                    contextBuilder.AppendLine("知识库检索参考信息:");
                    contextBuilder.AppendLine(genContext.KnowledgeContext);
                    contextBuilder.AppendLine();
                }

                finalUserPrompt = $"""
                                   请基于以下参考信息(包含数据库查询结果或检索文档)回答我的问题:

                                   <context>
                                   {contextBuilder}
                                   </context>

                                   回答要求:
                                   1. 引用参考信息时,请标注来源 ID(例如 [^1])。
                                   2. 针对数据分析结果,请结合用户问题进行自然语言解释。
                                   3. 在回答结尾,如果引用了知识库文档,请生成“参考资料”列表。
                                   4. 如果参考信息不足以回答问题,请直接说明,严禁编造。
                                   5. 保持回答专业、简洁。

                                   我的问题:
                                   {request.Message}
                                   """;

                logger.LogDebug("增强模式激活:注入知识({KSize}),注入数据({DSize})。",
                    genContext.KnowledgeContext?.Length ?? 0,
                    genContext.DataAnalysisContext?.Length ?? 0);
            }
            else
            {
                // 无上下文模式:直接透传用户问题
                finalUserPrompt = request.Message;
                logger.LogDebug("增强模式未激活:仅使用用户原始输入。");
            }

            // 4. 准备执行参数 (ChatOptions)
            // 将动态加载的工具集挂载到本次执行的选项中
            var runOptions = new ChatClientAgentRunOptions
            {
                ChatOptions = new ChatOptions
                {
                    Tools = genContext.Tools // <-- 动态挂载工具
                }
            };

            // 如果有注入任何上下文(知识或数据),都降低温度以保证事实性
            if (hasContext)
            {
                runOptions.ChatOptions.Temperature = 0.3f;
            }

            // 5. 构建 FinalAgentContext 并传递给下一个节点
            // 注意:我们这里不执行 RunStreamingAsync,而是创建好环境就交棒。
            var agentThread = agent.GetNewThread();
            var finalAgentContext = new FinalAgentContext
            {
                Agent = agent,
                Thread = agentThread,
                InputText = finalUserPrompt,
                RunOptions = runOptions,
                SessionId = request.SessionId
            };

            // 将构建好的 Context 发送给工作流的下一个节点 (即 FinalAgentRunExecutor)
            await context.SendMessageAsync(finalAgentContext, ct);
        }
        catch (Exception e)
        {
            logger.LogError(e, "最终 Agent 构建阶段发生错误");
            await context.AddEventAsync(new ExecutorFailedEvent(Id, e), ct);
            throw;
        }
    }
}
注意:上面代码中 新的 agentThread 没有持久化,未来可以扩展一下。
- 步骤 4:实现 Agent 流式运行执行器
//Qjy.AICopilot.AiGatewayService/Workflows/FinalAgentRunExecutor.cs
/// <summary>
/// Agent 流式运行执行器
/// 职责:执行对话循环,处理审批请求拦截与响应恢复。
/// </summary>
public class FinalAgentRunExecutor(
    ILogger<FinalAgentRunExecutor> logger) :
    Executor<FinalAgentContext, FinalAgentContext>("FinalAgentRunExecutor")
{
    public override async ValueTask<FinalAgentContext> HandleAsync(
        FinalAgentContext agentContext,
        IWorkflowContext context,
        CancellationToken cancellationToken = new())
    {
        try
        {
            // 1. 构建本次发送给 Agent 的消息列表
            List<ChatMessage> message = [];

            // 检查是否存在待处理的“批准 CallId”
            // 如果存在,说明这是审批后的恢复流程,而不是新的一轮对话
            var isApprovalResumption = agentContext.FunctionApprovalRequestContents.Count != 0
                                        && agentContext.FunctionApprovalCallIds.Count != 0;

            if (isApprovalResumption)
            {
                // --- 审批恢复逻辑 ---
                logger.LogInformation("检测到审批响应,正在恢复 Agent 执行...");

                foreach (var callId in agentContext.FunctionApprovalCallIds)
                {
                    // 在暂存的请求列表中查找对应的 RequestContent
                    var requestContent = agentContext.FunctionApprovalRequestContents
                        .FirstOrDefault(rc => rc.FunctionCall.CallId == callId);
                    if (requestContent == null)
                    {
                        logger.LogWarning("未找到 CallId: {CallId} 的审批请求上下文,跳过。", callId);
                        continue;
                    }

                    // 核心逻辑:模拟生成审批结果消息
                    // CreateResponse 是框架提供的方法,它会为特定的审批请求生成一个审批响应对象:
                    // True 表示通过审批,False 表示未通过审批
                    var isApproved = agentContext.InputText == "批准";
                    var response = requestContent.CreateResponse(isApproved);

                    // 将这个响应包装为 User 消息发送给 Agent
                    // Agent 收到后,内部机制会解除挂起状态,真正执行工具调用
                    message.Add(new ChatMessage(ChatRole.User, [response]));

                    // 清理已处理的请求
                    agentContext.FunctionApprovalRequestContents.Remove(requestContent);
                }

                // 清空本次处理的 ID 列表
                agentContext.FunctionApprovalCallIds.Clear();
            }
            else
            {
                // --- 正常对话逻辑 ---
                // 直接发送用户的 Prompt
                message.Add(new ChatMessage(ChatRole.User, agentContext.InputText));
            }

            // 2. 进入流式运行循环
            // 无论是初次运行还是恢复运行,都复用同一个 agentContext.Thread 和 RunOptions
            await foreach (var update in agentContext.Agent.RunStreamingAsync(
                               message,
                               agentContext.Thread,
                               agentContext.RunOptions,
                               cancellationToken))
            {
                // 3. 实时捕获流中的内容
                foreach (var content in update.Contents)
                {
                    // 关键点:拦截审批请求
                    // 如果 Agent 想要执行敏感操作,它不会直接执行,而是产生 FunctionApprovalRequestContent
                    #pragma warning disable MEAI001
                    if (content is FunctionApprovalRequestContent requestContent)
                    {
                        logger.LogInformation("Agent 发起审批请求: {Name}", requestContent.FunctionCall.Name);
                        // 我们必须将这个请求暂存到 Context 中,以便后续恢复时使用
                        agentContext.FunctionApprovalRequestContents.Add(requestContent);
                    }
                }

                // 4. 将更新事件转发给工作流,最终推送给前端
                await context.AddEventAsync(new AgentRunUpdateEvent(Id, update), cancellationToken);
            }

            // 返回更新后的 Context,以便状态保持
            return agentContext;
        }
        catch (Exception e)
        {
            logger.LogError(e, "最终Agent运行阶段发生错误");
            await context.AddEventAsync(new ExecutorFailedEvent(Id, e), cancellationToken);
            throw;
        }
    }
}
- 步骤 5:构建工作流,将原来的意图工作流,改成两个工作流。我们创建一个新的 WorkflowFactory 工厂方法
//Qjy.AICopilot.AiGatewayService/Workflows/WorkflowFactory.cs
public class WorkflowFactory(
    IntentRoutingExecutor intentRouting,
    ToolsPackExecutor toolsPack,
    KnowledgeRetrievalExecutor knowledgeRetrieval,
    DataAnalysisExecutor dataAnalysis,
    ContextAggregatorExecutor contextAggregator,
    FinalAgentBuildExecutor agentBuild,
    FinalAgentRunExecutor agentRun)
{
    public Workflow CreateIntentWorkflow()
    {
        var workflowBuilder = new WorkflowBuilder(intentRouting)
            // 1. 扇出 (Fan-out): 意图识别 -> [工具打包, 知识检索]
            // IntentRoutingExecutor 输出的 List<IntentResult> 会被广播给 targets 列表中的每一个节点
            .AddFanOutEdge(intentRouting, [toolsPack, knowledgeRetrieval, dataAnalysis])
            // 2. 扇入 (Fan-in): [工具打包, 知识检索] -> 聚合器
            // 聚合器接收来自 sources 列表的所有输出
            .AddFanInEdge([toolsPack, knowledgeRetrieval, dataAnalysis], contextAggregator)
            // 3. 线性连接: 聚合器 -> 最终处理
            .AddEdge(contextAggregator, agentBuild)
            .AddEdge(agentBuild, agentRun)
            .WithOutputFrom(agentRun);

        return workflowBuilder.Build();
    }

    public Workflow CreateFinalAgentRunWorkflow()
    {
        var workflowBuilder = new WorkflowBuilder(agentRun);
        return workflowBuilder.Build();
    }
}
- 步骤 6:删除旧的意图工作流,并实现注册
//Qjy.AICopilot.AiGatewayService/Workflows/WorkflowFactory.cs
- 步骤 7:扩展返回类型,现在工作流多了一个需要审批的返回数据,我们这里添加一下返回类型
//Qjy.AICopilot.AiGatewayService/Agents/ChunkType.cs
[JsonConverter(typeof(JsonStringEnumConverter))]
public enum ChunkType
{
    Error,
    Text,
    Intent,
    FunctionCall,
    FunctionResult,
    Widget,
    ApprovalRequest
}
- 步骤 8:修改 ChatStreamRequest,添加 CallIds 参数,如果 CallIds 不为空,表示这是一次针对特定工具调用的审批请求
//Qjy.AICopilot.AiGatewayService/Agents/ChatStreamRequest.cs
[AuthorizeRequirement("AiGateway.Chat")]
// CallId 列表:如果不为空,表示这是一次针对特定工具调用的审批响应
public record ChatStreamRequest(Guid SessionId, string Message, List<string>? CallIds) : IStreamRequest<ChatChunk>;

public class ChatStreamHandler(
    IDataQueryService queryService,
    WorkflowFactory workflowFactory)
    : IStreamRequestHandler<ChatStreamRequest, ChatChunk>
{
    // 内存状态存储:SessionId -> 挂起的 AgentContext
    private static readonly Dictionary<Guid, FinalAgentContext> AgentContexts = new();

    public async IAsyncEnumerable<ChatChunk> Handle(ChatStreamRequest request, [EnumeratorCancellation] CancellationToken ct)
    {
        // 1. 基础校验
        if (!queryService.Sessions.Any(session => session.Id == request.SessionId))
        {
            throw new Exception("未找到会话");
        }

        // 2. 路由判断:是审批响应还是新对话?
        if (request.CallIds != null && request.CallIds.Count != 0)
        {
            // --- 分支 A:处理审批响应 ---
            // 尝试从内存中取出之前挂起的 Context
            AgentContexts.TryGetValue(request.SessionId, out var agentContext);
            if (agentContext == null)
            {
                throw new Exception("会话已过期或上下文丢失,无法完成审批流程。");
            }

            // 更新 Context 状态
            agentContext.InputText = request.Message; // "批准" 或 "拒绝"
            agentContext.FunctionApprovalCallIds.AddRange(request.CallIds); // 用户批准的 ID 列表

            // 创建仅包含 AgentRun 阶段的短工作流
            // 我们不需要重新执行 Build,直接复用现有的 AgentContext
            var workflow = workflowFactory.CreateFinalAgentRunWorkflow();

            // 启动工作流(传入AgentContext)
            await using var workflowRun = await InProcessExecution.StreamAsync(workflow, agentContext, cancellationToken: ct);

            // 监听并转发事件
            await foreach (var chatChunk in RunWorkflow(workflowRun, request.SessionId, ct))
            {
                yield return chatChunk;
            }

            // 流程结束后,如果所有审批请求都处理完了,就可以移除缓存
            if (agentContext.FunctionApprovalRequestContents.Count == 0)
            {
                AgentContexts.Remove(request.SessionId);
            }
        }
        else
        {
            // --- 分支 B:处理新对话 ---
            // 创建完整的意图识别工作流 (Intent -> ... -> Build -> Run)
            var workflow = workflowFactory.CreateIntentWorkflow();

            // 启动工作流(传入用户请求)
            await using var workflowRun = await InProcessExecution.StreamAsync(workflow, request, cancellationToken: ct);

            // 监听并转发事件
            await foreach (var chatChunk in RunWorkflow(workflowRun, request.SessionId, ct))
            {
                yield return chatChunk;
            };
        }
    }

    // 事件转换逻辑:将工作流事件转换为前端可消费的 ChatChunk
    // [增加] 监听函数审批请求对象
    private async IAsyncEnumerable<ChatChunk> RunWorkflow(StreamingRun workflowRun, Guid sessionId, CancellationToken ct)
    {
        await foreach (var workflowEvent in workflowRun.WatchStreamAsync(ct))
        {
            Console.WriteLine(workflowEvent);
            switch (workflowEvent)
            {
                case WorkflowOutputEvent evt:
                    if (evt.Data is FinalAgentContext agentContext && agentContext.FunctionApprovalRequestContents.Count != 0)
                    {
                        AgentContexts.TryAdd(sessionId, agentContext);
                    }
                    break;
                case ExecutorFailedEvent evt:
                    yield return new ChatChunk(evt.ExecutorId, ChunkType.Error, evt.Data?.Message ?? string.Empty);
                    break;
                case AgentRunResponseEvent evt:
                    switch (evt.ExecutorId)
                    {
                        case "IntentRoutingExecutor":
                            yield return new ChatChunk(evt.ExecutorId, ChunkType.Intent, evt.Response.Text);
                            break;
                        case "DataAnalysisExecutor":
                            yield return new ChatChunk(evt.ExecutorId, ChunkType.Widget, evt.Response.Text);
                            break;
                    }
                    break;
                case AgentRunUpdateEvent evt:
                    foreach (var evtContent in evt.Update.Contents)
                    {
                        switch (evtContent)
                        {
                            case TextContent content:
                                yield return new ChatChunk(evt.ExecutorId, ChunkType.Text, content.Text);
                                break;
                            case FunctionCallContent content:
                                var fun = new
                                {
                                    id = content.CallId,
                                    name = content.Name,
                                    args = content.Arguments
                                };
                                yield return new ChatChunk(evt.ExecutorId, ChunkType.FunctionCall, fun.ToJson());
                                break;
                            case FunctionResultContent content:
                                var result = new
                                {
                                    id = content.CallId,
                                    result = content.Result
                                };
                                yield return new ChatChunk(evt.ExecutorId, ChunkType.FunctionResult,
                                    result.ToJson());
                                break;
                            #pragma warning disable MEAI001
                            case FunctionApprovalRequestContent content:
                                // 监听函数审批请求对象
                                var approval = new
                                {
                                    callId = content.FunctionCall.CallId,
                                    name = content.FunctionCall.Name,
                                    args = content.FunctionCall.Arguments
                                };
                                yield return new ChatChunk(evt.ExecutorId, ChunkType.ApprovalRequest,
                                    approval.ToJson());
                                break;
                        }
                    }
                    break;
            }
        }
    }
}
步骤 9:代码整理。这一步非必要,到目前 Workflows 文件夹下面的类比较多了,可以创建一个 Executors 文件夹,将所有的执行器移到该文件夹里面。
另外可以将所有的执行器,把继承 : ReflectingExecutor
("xxx"), IMessageHandler<List , BranchResult>,改成继承 Executor ("xxx")。下面用 DataAnalysisExecutor 举例
public class DataAnalysisExecutor() : ReflectingExecutor<DataAnalysisExecutor>("DataAnalysisExecutor"),
      IMessageHandler<List<IntentResult>, BranchResult>
    public async ValueTask<BranchResult> HandleAsync()
    {
        return BranchResult.FromDataAnalysis(string.Empty);
    }
}
//改成
public class DataAnalysisExecutor() : Executor<List<IntentResult>>("DataAnalysisExecutor")
{
    public override async ValueTask HandleAsync()
    {
        // 将旧的 return,改成调用 SendMessageAsync,
        // 再 return
        await context.SendMessageAsync(BranchResult.FromDataAnalysis(string.Empty), cancellationToken);
        return;
    }
}
四、审批请求前端适配
1. 新增审批数据模型
- 新增 ChunkType 枚举项
//Qjy.AICopilot.VueUI/src/types/protocols.ts
export enum ChunkType {
  Error = 'Error',
  Text = 'Text',
  Intent = 'Intent',
  Widget = 'Widget',
  FunctionResult = 'FunctionResult',
  FunctionCall = 'FunctionCall',
  ApprovalRequest = 'ApprovalRequest'   // 新增
}
- 添加审批请求对象
//Qjy.AICopilot.VueUI/src/types/protocols.ts
/**
 * 函数审批请求
 */
export interface FunctionApprovalRequest {
  callId: string;
  name: string;
  args: string;
}
- 扩展审批请求消息片段块
//Qjy.AICopilot.VueUI/src/types/models.ts
/**
 * 扩展消息块-审批请求片段
 * 用于在消息列表中渲染审批卡片
 */
export interface ApprovalChunk extends ChatChunk {
  // 复用传输层的载体数据
  request: FunctionApprovalRequest;

  // 审批单的当前状态
  // pending: 等待用户操作
  // approved: 用户已批准
  // rejected: 用户已拒绝
  status: 'pending' | 'approved' | 'rejected';
}
2. API 接口扩展
//Qjy.AICopilot.VueUI/src/services/chatService.ts
/**
 * 发送消息并接收流式响应
 * @param sessionId 会话ID
 * @param message 用户输入的内容
 * @param callbacks 回调函数集合
 */
async sendMessageStream(sessionId: string, message: string, callbacks: StreamCallbacks, callIds?: string[]) {
  const ctrl = new AbortController();

  try {
    // 使用微软的库发起 SSE 请求
    await fetchEventSource(`${baseUrl}/aigateway/chat`, {
      method: 'POST',
      headers: {
        'Content-Type': 'application/json',
        'Authorization': `Bearer ${token}`
      },
      body: JSON.stringify({
        sessionId: sessionId,
        message: message,
        callIds: callIds
      }),
      signal: ctrl.signal,

      // 1. 处理连接打开
      async onopen(response) {
        if (response.ok) {
          return; // 连接成功
        } else {
          throw new Error(`连接失败: ${response.status}`);
        }
      },

      // 2. 处理消息接收
      onmessage(msg) {
        try {
          // 解析后端发来的 ChatChunk JSON
          const chunk: ChatChunk = JSON.parse(msg.data);
          console.log(chunk);
          callbacks.onChunkReceived(chunk);
        } catch (err) {
          console.error('无法解析区消息块:', err);
        }
      },

      // 3. 处理连接关闭
      onclose() {
        callbacks.onComplete();
      },

      // 保持连接,即使页面进入后台
      openWhenHidden: true
    });
  } catch (err) {
    callbacks.onError(err);
  }
}
3. 审批状态数据处理
- 添加正在处理的属性
//Qjy.AICopilot.VueUI/src/stores/chatStore.ts
// 是否正在等待用户审批
// 当此值为 true 时,聊天输入框应当被禁用或锁定
const isWaitingForApproval = ref(false);
- 创建和切换新会话时重置数据状态
//Qjy.AICopilot.VueUI/src/stores/chatStore.ts
async function createNewSession() {
    const newSession = await chatService.createSession();
    sessions.value.unshift(newSession);
    currentSessionId.value = newSession.id;
    messagesMap.value[newSession.id] = [];
    isStreaming.value = false;
    isWaitingForApproval.value = false;
}
- 审批处理函数
//Qjy.AICopilot.VueUI/src/stores/chatStore.ts
/**
  * 提交审批
  * @param callId 审批单 ID
  * @param chunk 审批数据块
  */
async function submitApproval(callId: string, chunk: ApprovalChunk) {
    if (!currentSessionId.value) return;

    const sessionId = currentSessionId.value;

    try {
        // 1. 准备接收新的流
        isStreaming.value = true;

        // 找到要追加的目标消息(即包含审批请求的那条 AI 消息)
        let targetMsg = getLastAssistantMessage(sessionId);
        // 如果找不到(极少见),则创建一条新的
        if (!targetMsg) {
            targetMsg = addMessage(sessionId, {
                sessionId,
                role: MessageRole.Assistant,
                chunks: [],
                isStreaming: true,
                timestamp: Date.now()
            });
        }

        // 2. 调用服务
        const messageText = chunk.status === 'approved' ? "批准" : "拒绝";
        await chatService.sendMessageStream(
            sessionId,
            messageText,
            {
                onChunkReceived: (chunk: ChatChunk) => {
                    // 回调逻辑复用了之前的 chunk 处理函数
                    // 无论是初始对话还是恢复对话,只要是 ChatChunk,处理方式都是一样的
                    processChunk(targetMsg!, chunk);
                },
                onComplete: () => {
                    isStreaming.value = false;
                    if (targetMsg) targetMsg.isStreaming = false;

                    // 流结束意味着本次人机交互闭环完成
                    // 解除全局挂起锁,允许用户发送新消息
                    isWaitingForApproval.value = false;
                },
                onError: (err) => {
                    console.error('审批响应流中断:', err);
                    isStreaming.value = false;
                    isWaitingForApproval.value = false;
                }
            },
            [callId]
        );

    } catch (error) {
        console.error('提交审批失败:', error);
        isStreaming.value = false;
    }
}

// ================= 辅助函数 (Internal) =================
/**
 * 处理审批请求数据块
 */
function addApprovalRequestChunk(msg: ChatMessage, chunk: ChatChunk) {
    try {
        // 1. 反序列化后端传递的 Payload
        // 注意:content 字段是 FunctionApprovalRequestContent 的 JSON 字符串
        const requestPayload = JSON.parse(chunk.content) as FunctionApprovalRequest;

        // 2. 构造前端使用的 ViewModel
        const approvalChunk: ApprovalChunk = {
            ...chunk,              // 保留 source, type 等基础元数据
            request: requestPayload,
            status: 'pending'      // 初始状态默认为“待处理”
        };

        // 3. 将块追加到当前消息的消息体中
        // 这样 UI 层的 v-for 循环就能渲染出对应的 ApprovalCard 组件
        msg.chunks.push(approvalChunk);

        // 4. 触发全局锁定
        // 这是一个关键的副作用:告知整个应用现在进入“人机协作模式”
        // 输入框组件监听到此状态后,应变为 Disabled 状态
        isWaitingForApproval.value = true;

        console.log(`收到审批请求: [${requestPayload.name}] ID: ${requestPayload.callId}`);

    } catch (error) {
        console.error('解析审批请求失败:', error, chunk.content);
        // 在生产环境中,这里可能需要生成一个 ErrorChunk 来提示用户
    }
}

/**
   * 获取当前正在生成的 AI 消息
   * 用于审批恢复后,将后续内容追加到同一条消息气泡中
   */
function getLastAssistantMessage(sid: string): ChatMessage | null {
    const list = messagesMap.value[sid];
    if (!list || list.length === 0) return null;

    const lastMsg = list[list.length - 1]!;
    if (lastMsg.role === MessageRole.Assistant) {
        return lastMsg;
    }
    return null;
}

/**
   * 将 processChunk 提取为独立函数
   * 原本在 sendMessage 中的 switch case 逻辑,现在被两个 Action 复用
   */
function processChunk(msg: ChatMessage, chunk: ChatChunk) {
    switch (chunk.type) {
        case ChunkType.Text:
            addTextChunk(msg, chunk);
            break;
        case ChunkType.Intent:
            addIntentChunk(msg, chunk);
            break;
        case ChunkType.FunctionCall:
            addFunctionCallChunk(msg, chunk);
            break;
        case ChunkType.FunctionResult:
            addFunctionResultChunk(msg, chunk);
            break;
        case ChunkType.Widget:
            addWidgetChunk(msg, chunk);
            break;
        case ChunkType.ApprovalRequest:
            addApprovalRequestChunk(msg, chunk);
            break;
    }
}

// 导出
return {
    sessions,
    currentSessionId,
    currentSession,
    currentMessages,
    isStreaming,
    isWaitingForApproval,
    init,
    createNewSession,
    selectSession,
    sendMessage,
    submitApproval
};
4. 构建审批卡片组件
- 实现审批卡片组件
//Qjy.AICopilot.VueUI/src/components/chat/ApprovalCart.vue
<script setup lang="ts">
import { computed, ref } from 'vue';
import type { ApprovalChunk } from '@/types/models';
import ArgumentViewer from './ArgumentViewer.vue';
// 定义 Props
interface Props {
chunk: ApprovalChunk;
}
const props = defineProps<Props>();
// 定义 Events
// 组件只负责展示和交互,具体的 API 调用逻辑交由父组件或 Store 处理
const emit = defineEmits<{
(e: 'approve', callId: string): void;
(e: 'reject', callId: string): void;
}>();
// 本地 loading 状态,防止重复点击
const isProcessing = ref(false);
// 提取核心数据
const request = computed(() => props.chunk.request);
const status = computed(() => props.chunk.status);
// 判断当前是否处于可交互状态
const isPending = computed(() => status.value === 'pending');
const handleApprove = () => {
if (isProcessing.value) return;
isProcessing.value = true;
// 抛出事件,携带 CallId
emit('approve', request.value.callId);
};
const handleReject = () => {
if (isProcessing.value) return;
isProcessing.value = true;
emit('reject', request.value.callId);
};
</script>
<template>
<div class="approval-card" :class="status">
<div class="card-header">
<div class="header-icon">
<svg xmlns="http://www.w3.org/2000/svg" viewBox="0 0 24 24" fill="none" stroke="currentColor" stroke-width="2">
<path stroke-linecap="round" stroke-linejoin="round" d="M12 9v2m0 4h.01m-6.938 4h13.856c1.54 0 2.502-1.667 1.732-3L13.732 4c-.77-1.333-2.694-1.333-3.464 0L3.34 16c-.77 1.333.192 3 1.732 3z" />
</svg>
</div>
<div class="header-content">
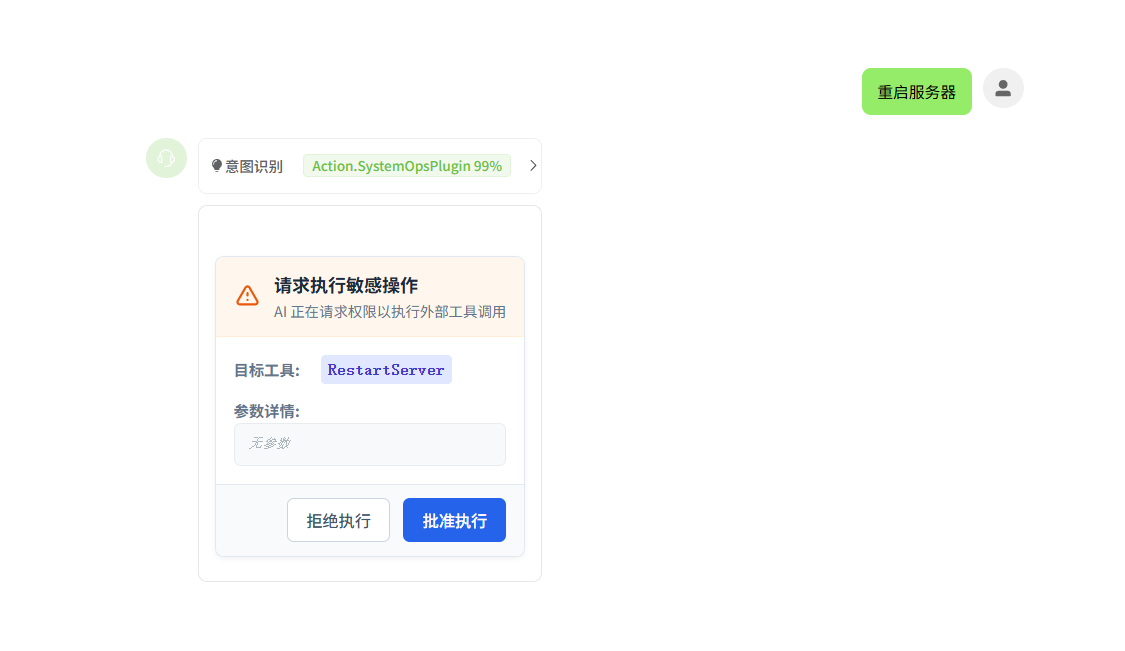
<h3 class="title">请求执行敏感操作</h3>
<p class="subtitle">AI 正在请求权限以执行外部工具调用</p>
</div>
<div v-if="!isPending" class="status-badge" :class="status">
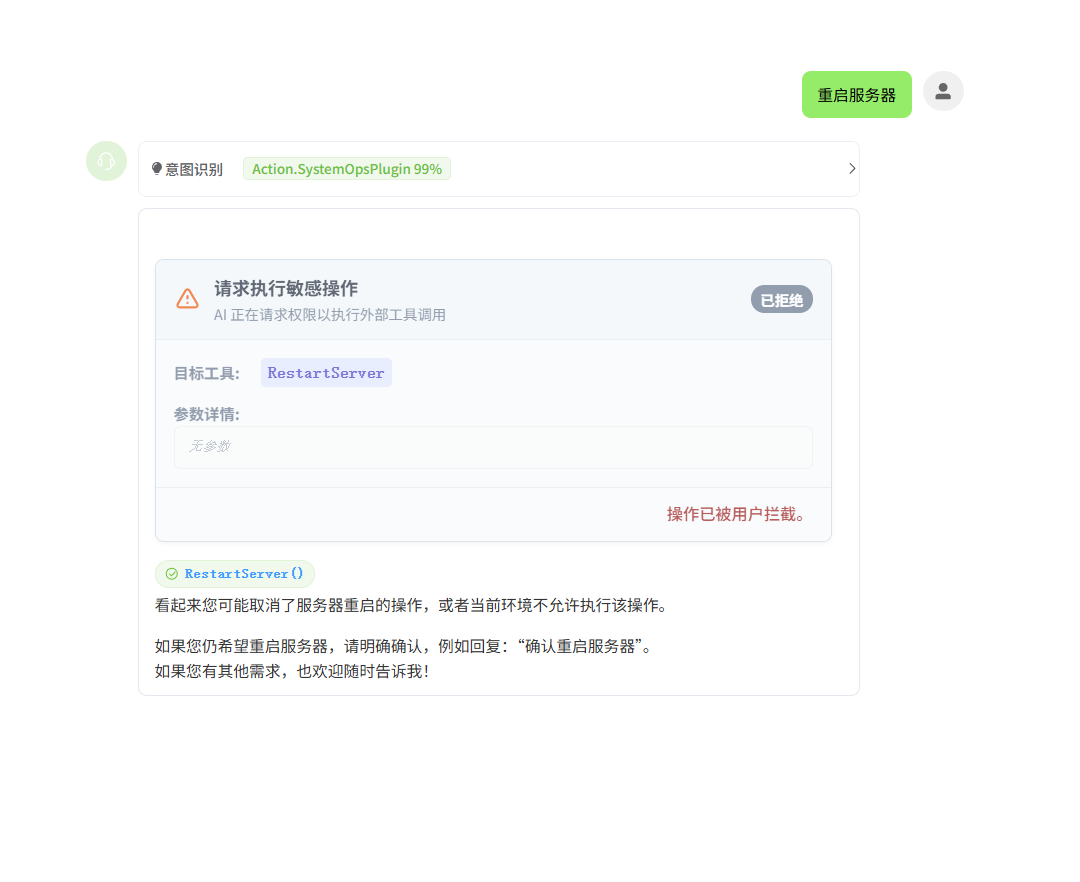
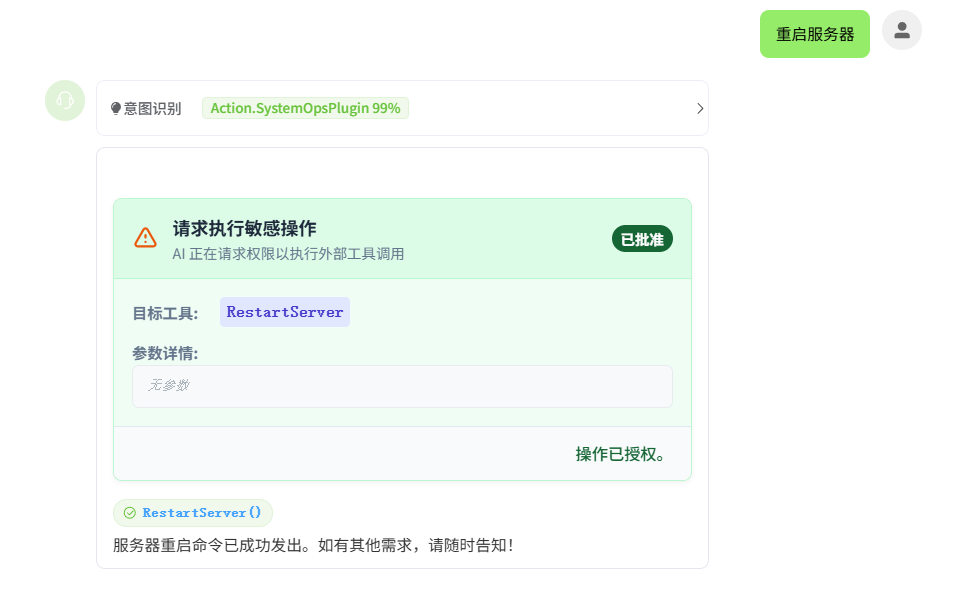
{{ status === 'approved' ? '已批准' : '已拒绝' }}
</div>
</div>
<div class="card-body">
<div class="function-info">
<span class="label">目标工具:</span>
<code class="function-name">{{ request.name }}</code>
</div>
<div class="arguments-section">
<span class="label">参数详情:</span>
<ArgumentViewer :args="request.args" />
</div>
</div>
<div class="card-footer">
<template v-if="isPending">
<button
class="btn btn-reject"
@click="handleReject"
:disabled="isProcessing"
>
拒绝执行
</button>
<button
class="btn btn-approve"
@click="handleApprove"
:disabled="isProcessing"
>
<span v-if="isProcessing">处理中...</span>
<span v-else>批准执行</span>
</button>
</template>
<div v-else class="result-message">
<span v-if="status === 'approved'" class="text-success">
操作已授权。
</span>
<span v-else class="text-danger">
操作已被用户拦截。
</span>
</div>
</div>
</div>
</template>
<style scoped>
/* 卡片容器:默认样式 */
.approval-card {
border: 1px solid #e2e8f0;
border-radius: 8px;
background: white;
margin: 12px 0;
box-shadow: 0 2px 4px rgba(0,0,0,0.05);
overflow: hidden;
transition: all 0.3s ease;
max-width: 600px;
}
/* 状态修饰符:已拒绝 */
.approval-card.rejected {
opacity: 0.7;
border-color: #cbd5e1;
background: #f8fafc;
}
/* 状态修饰符:已批准 */
.approval-card.approved {
border-color: #bbf7d0;
background: #f0fdf4;
}
/* --- Header 区域 --- */
.card-header {
display: flex;
align-items: center;
padding: 12px 16px;
background: #fff7ed; /* 浅橙色背景警告 */
border-bottom: 1px solid #ffedd5;
}
.approval-card.approved .card-header {
background: #dcfce7; /* 浅绿色 */
border-bottom-color: #bbf7d0;
}
.approval-card.rejected .card-header {
background: #f1f5f9; /* 浅灰色 */
border-bottom-color: #e2e8f0;
}
.header-icon {
width: 24px;
height: 24px;
margin-right: 12px;
color: #ea580c; /* 深橙色图标 */
}
.header-content {
flex: 1;
}
.title {
margin: 0;
font-size: 1rem;
font-weight: 600;
color: #1e293b;
}
.subtitle {
margin: 0;
font-size: 0.8rem;
color: #64748b;
}
/* --- Body 区域 --- */
.card-body {
padding: 16px;
}
.function-info {
display: flex;
align-items: center;
margin-bottom: 12px;
}
.label {
font-size: 0.85rem;
font-weight: 600;
color: #64748b;
margin-right: 8px;
width: 70px; /* 固定宽度对齐 */
}
.function-name {
background: #e0e7ff;
color: #4338ca;
padding: 2px 6px;
border-radius: 4px;
font-family: monospace;
font-weight: bold;
}
.risk-alert {
margin-top: 12px;
padding: 8px;
background: #fef2f2;
border: 1px solid #fecaca;
color: #991b1b;
font-size: 0.85rem;
border-radius: 4px;
}
/* --- Footer 区域 --- */
.card-footer {
padding: 12px 16px;
background: #f8fafc;
border-top: 1px solid #e2e8f0;
display: flex;
justify-content: flex-end;
gap: 12px;
}
/* 按钮样式 */
.btn {
padding: 8px 16px;
border-radius: 6px;
font-size: 0.9rem;
font-weight: 500;
cursor: pointer;
border: 1px solid transparent;
transition: all 0.2s;
}
.btn:disabled {
opacity: 0.6;
cursor: not-allowed;
}
.btn-reject {
background: white;
border-color: #cbd5e1;
color: #475569;
}
.btn-reject:hover:not(:disabled) {
background: #f1f5f9;
color: #ef4444; /* 悬停变红 */
border-color: #ef4444;
}
.btn-approve {
background: #2563eb; /* 品牌蓝 */
color: white;
}
.btn-approve:hover:not(:disabled) {
background: #1d4ed8;
box-shadow: 0 2px 4px rgba(37, 99, 235, 0.3);
}
.status-badge {
font-size: 0.8rem;
padding: 2px 8px;
border-radius: 12px;
font-weight: 600;
}
.status-badge.approved {
background: #166534;
color: white;
}
.status-badge.rejected {
background: #64748b;
color: white;
}
.result-message {
font-size: 0.9rem;
font-weight: 500;
}
.text-success { color: #166534; }
.text-danger { color: #991b1b; }
</style>
- 实现审批卡片参数组件,该组件被审批卡片使用,审批卡片会有 0或多个参数,使用一个专门的组件来显示参数信息
//Qjy.AICopilot.VueUI/src/components/chat/ArgumentViewer.vue
<script setup lang="ts">
import { computed } from 'vue';

interface Props {
  // 接收联合类型:可以是对象,也可以是字符串
  args: string | Record<string, any>;
}

const props = defineProps<Props>();

// 计算属性:统一转换为 { key, value } 数组
const parsedArgs = computed(() => {
  // 1. 空值处理
  if (!props.args) return [];

  let content = props.args;

  // 2. 如果是字符串,尝试解析为对象
  if (typeof content === 'string') {
    try {
      const parsed = JSON.parse(content);
      // 只有解析结果是“非数组的对象”时,才视为字典处理
      if (parsed && typeof parsed === 'object' && !Array.isArray(parsed)) {
        content = parsed;
      } else {
        // 虽然解析成功但不是字典(如数组、数字),或者解析失败,都视为原始字符串展示
        return [{ key: 'Raw', value: content, type: 'string' }];
      }
    } catch (e) {
      // JSON 解析异常,直接展示原始字符串
      return [{ key: 'Raw', value: content, type: 'string' }];
    }
  }

  // 3. 此时 content 应该是一个对象,进行最后的校验并遍历
  if (content && typeof content === 'object' && !Array.isArray(content)) {
    return Object.keys(content).map(key => ({
      key,
      value: (content as Record<string, any>)[key],
      type: typeof (content as Record<string, any>)[key]
    }));
  }

  // 4. 兜底:既不是字符串也不是合法对象,强转字符串展示
  return [{ key: 'Raw', value: String(props.args), type: 'string' }];
});

// 辅助函数:格式化特定的值
const formatValue = (val: any) => {
  if (val === null) return 'null';
  if (typeof val === 'boolean') return val ? 'True' : 'False';
  if (typeof val === 'object') return JSON.stringify(val);
  return String(val);
};
</script>

<template>
  <div class="arg-viewer">
    <div v-if="parsedArgs.length === 0" class="empty-args">
      无参数
    </div>

    <div v-else class="arg-list">
      <div
        v-for="item in parsedArgs"
        :key="item.key"
        class="arg-item"
      >
        <span class="arg-key">{{ item.key }}:</span>

        <code v-if="item.type === 'string' && (item.value as string).length > 50" class="arg-value long-text">
          {{ item.value }}
        </code>

        <span v-else :class="['arg-value', item.type]">
          {{ formatValue(item.value) }}
        </span>
      </div>
    </div>
  </div>
</template>

<style scoped>
.arg-viewer {
  background-color: #f8f9fa;
  border-radius: 6px;
  padding: 8px 12px;
  font-family: 'Consolas', 'Monaco', monospace;
  font-size: 0.9em;
  border: 1px solid #e9ecef;
}

.empty-args {
  color: #adb5bd;
  font-style: italic;
}

.arg-item {
  display: flex;
  align-items: baseline;
  margin-bottom: 4px;
  line-height: 1.5;
}

.arg-item:last-child {
  margin-bottom: 0;
}

.arg-key {
  color: #495057;
  font-weight: 600;
  margin-right: 8px;
  flex-shrink: 0; /* 防止 Key 被压缩 */
}

.arg-value {
  color: #212529;
  word-break: break-all; /* 允许在任意字符间换行 */
}

.arg-value.boolean {
  color: #d63384; /* 布尔值用洋红色 */
}

.arg-value.number {
  color: #0d6efd; /* 数字用蓝色 */
}

.arg-value.long-text {
  display: block;
  background-color: #fff;
  border: 1px solid #dee2e6;
  padding: 4px;
  border-radius: 4px;
  margin-top: 4px;
  white-space: pre-wrap; /* 保留换行符 */
  color: #d9534f; /* 字符串用红色 */
  width: 100%;
}
</style>
- 修改消息组件,因为后台没有 FinalProcessExecutor 执行器了,修改成 FinalAgentRunExecutor
//Qjy.AICopilot.VueUI/src/components/chat/ArgumentViewer.vue
<script setup lang="ts">
const finalChunks = computed(() =>
  props.message.chunks.filter(chunk => chunk.source === 'FinalAgentRunExecutor' || chunk.source === 'User') || []
);
</script>
- 修改最终处理组件
- 添加处理用户批准和拒绝操作
- 引用审批组件
<script setup lang="ts">
  import { renderMarkdown } from '@/utils/markdown';
  import FunctionCallItem from './FunctionCallItem.vue';
  import ApprovalCard from './ApprovalCard.vue';
  import { type ChatChunk, ChunkType } from "@/types/protocols.ts";
  import type { ApprovalChunk, FunctionCallChunk } from "@/types/models.ts";
  import { useChatStore } from '@/stores/chatStore';

  // 连接 Store
  const store = useChatStore();

  const props = defineProps<{
    chunks: ChatChunk[]
    isUser: boolean;
    isStreaming: boolean;
  }>();

  const getFunctionCall = (chunk: ChatChunk): FunctionCallChunk =>
    chunk as FunctionCallChunk;

  /**
   * 处理用户批准操作
   * @param callId 审批单 ID
   * @param chunk 审批数据块
   */
  const onApprove = async (callId: string, chunk: ApprovalChunk) => {
    chunk.status = 'approved';
    await store.submitApproval(callId, chunk);
  };

  /**
   * 处理用户拒绝操作
   * @param callId 审批单 ID
   * @param chunk 审批数据块
   */
  const onReject = async (callId: string, chunk: ApprovalChunk) => {
    chunk.status = 'rejected';
    await store.submitApproval(callId, chunk);
  };
</script>

<template>
  <div class="block-final message-bubble" :class="isUser ? 'bubble-user' : 'bubble-ai'">
    <template v-for="chunk in chunks">
      <div v-if="chunk.type === ChunkType.Text"
           class="markdown-body inline-block-container"
           v-html="renderMarkdown(chunk.content)"></div>

      <div v-else-if="chunk.type === ChunkType.FunctionCall"
           class="my-1 inline-block">
        <FunctionCallItem :call="getFunctionCall(chunk).functionCall"
                          :mini="true" />
      </div>

      <ApprovalCard v-else-if="chunk.type === ChunkType.ApprovalRequest"
                    :chunk="chunk as ApprovalChunk"
                    @approve="(id) => onApprove(id, chunk as ApprovalChunk)"
                    @reject="(id) => onReject(id, chunk as ApprovalChunk)" />

      <span v-if="isStreaming" class="cursor-blink">|</span>
    </template>
  </div>
</template>
- 修改消息窗体页面
- 当需要审批时,为了不污染 AI 上下文,不允许用户继续发送消息
- 添加一个禁用的样式
<script setup lang="ts">
// 计算属性:是否允许输入
// 只有在既没有流式传输,也没有等待审批时,才允许输入
const isInputDisabled = computed(() => {
  return store.isStreaming || store.isWaitingForApproval
});

// 计算 Placeholder 提示文案
const inputPlaceholder = computed(() => {
  if (store.isWaitingForApproval) return "请先处理上方的审批请求...";
  if (store.isStreaming) return "AI 正在思考中...";
  return "输入您的问题 (Enter 发送, Shift+Enter 换行)..."; // 默认文案
});
</script>
<template>
  <div class="chat-layout">

    <div class="main-wrapper">

      <footer class="chat-input-area">
        <div class="input-container">
          <el-input
            v-model="inputValue"
            type="textarea"
            :autosize="{ minRows: 1, maxRows: 4 }"
            :placeholder=inputPlaceholder
            @keydown.enter.prevent="(e:KeyboardEvent) => { if(!e.shiftKey) handleSend() }"
            :disabled="isInputDisabled"
          />
          <el-button
            type="primary"
            class="send-btn"
            :disabled="isInputDisabled || !inputValue.trim()"
            @click="handleSend"
          >
            <el-icon><Promotion /></el-icon>
          </el-button>
        </div>
        <div class="footer-tip">
          AI 生成的内容可能不准确,请核实重要信息。
        </div>
      </footer>
    </div>
  </div>
</template>

<style scoped>
/* 给禁用状态的输入框加一些样式,增强视觉反馈 */
textarea:disabled {
  background-color: #f3f4f6;
  cursor: not-allowed;
  color: #9ca3af;
}
</style>
5. 测试
至此,审批功能就完成了,我们来看看效果。